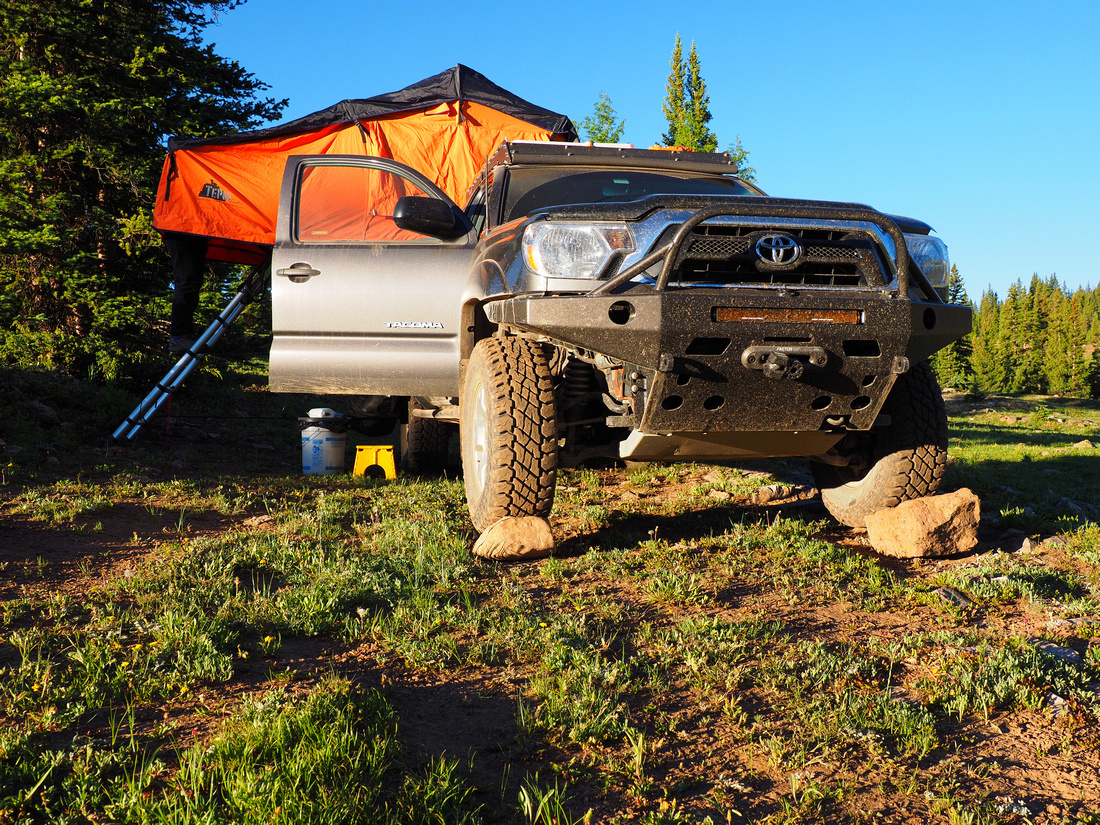
Exterior setup: Unzip the cover, release straps, extend ladder, use ladder to leverage the tent open, adjust ladder, insert window rods (if used) & vestibule U-pole, loop vestibule guy lines to ladder feet - I've never bothered to stake the lines properly. Load the tent with whatever is lacking, and you're done. Rolling up the cover is optional. If leveling is required, it's usually not that hard.
 Here's a Tepui Tents video that covers setup. Many folding RTTs will operate similarly. Skip ahead to 5:13 for the setup portion.
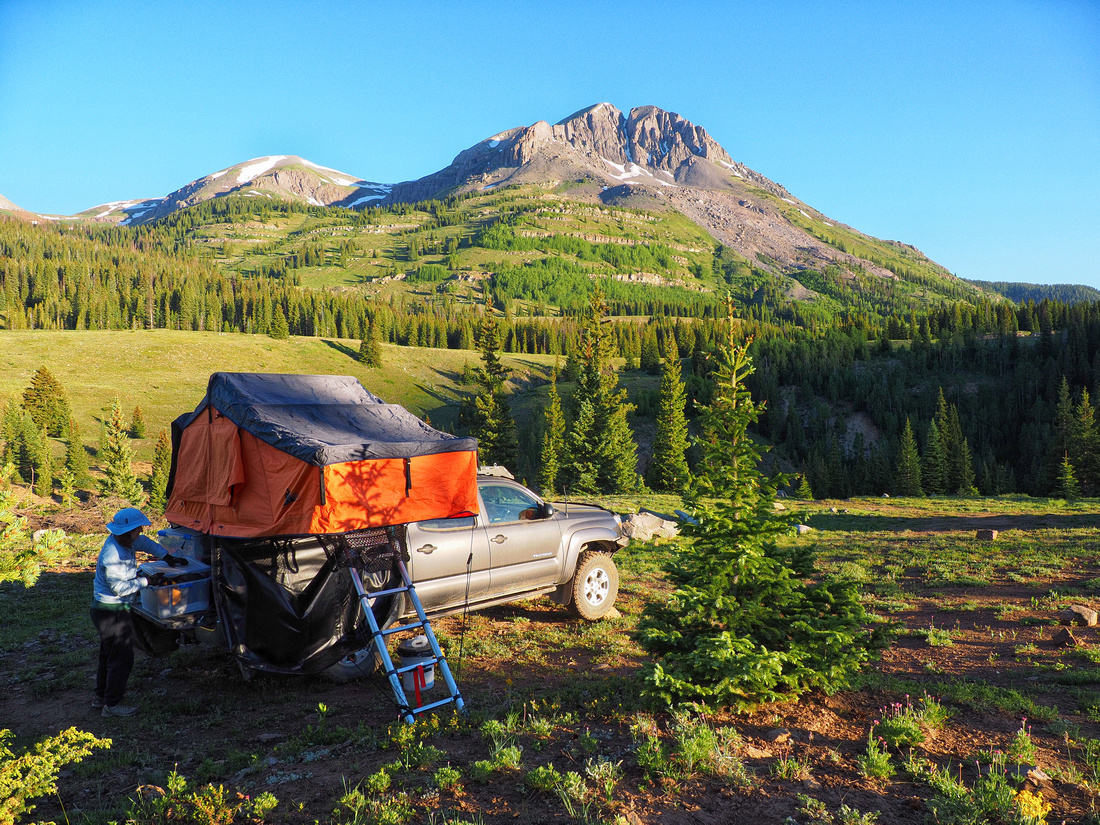
Interior setup: I leave two flat sheets inside the RTT; one to sleep on, one to sleep under. In a weathertight storage bin, stored in stuff sacks, I keep a down comforter, sleeping bags (not always needed), and pillows, with a light dedicated to RTT use. Using stuff sacks also protects the bedding in case of precipitation. Once the RTT is popped up, all of the bin contents go inside, along with any clothes, books, etc. that may be needed for the night. In the morning, everything returns to stuff sacks and is positioned by the RTT door, so it can be returned to the bin quickly from outside.
Packing: Wake up, stuff bedding in sacks, get dressed, close windows, put everything inside by the tent door, and out I go. Remove window rods (if used), remove vestibule U-pole (not all tents have one), fold tent closed, stow ladder/U-pole/rods on top of tent, stuff tent fabric in sides, tighten side straps, pull cover over folded tent, zip cover closed, apply cover straps.
Common Problems: Two common sources of problems come from trying to squeeze too much bedding inside the RTT when packing it, and from loading too many things inside while trying to use it. I experienced both early on, and learned that avoiding those problems increased my satisfaction with the tent. Storing extra bedding inside seems like a good idea, but if it causes the tent to become difficult to collapse, zipping up the cover can become a real chore. It's better to store bedding separately and avoid that fight, in my opinion. The other problem develops when too many extras are loaded inside, leading to cramped quarters and more time spent setting up and taking down the tent. It's easy to waste time fiddling with many individual items. A better solution would be to keep tent items in a single small bag so there's only one more thing to move in & out.
With my tent, setup is quick in any weather I've experienced (high wind, rain, snow). In high wind, I've attached a load strap from my truck to the free side of the floor to stabilize it a bit, along with one from the truck to the base of the ladder. I take out the slack, but don't tighten the straps much. I've only had to do this once during a very gusty night in North Dakota. I have an annex and weatherhood, but haven't used them yet. The next time I have a winter base camp, I'll give both a try.

I also use a small, folding step stool and my truck's sliders for better access when working on the RTT. As for the perils of bad weather, I don't have to spend much time outside, and I have the appropriate clothing anyway. I don't believe there's much physical effort required, but setting up an RTT is more taxing than climbing into a travel trailer or RV. The most demanding task is opening & closing the tent, and that's made easier if the ladder is fully extended, and/or two people work the ladder together.
The more you go through the process, the faster it gets. An RTT isn't the right shelter for everyone and every condition, but I find mine to be a very useful, comfortable option when I'm staying with my truck for the night. Nothing above is innovative, but after many confused conversations about my RTT, I don't believe that the simplicity of setup & packing is immediately apparent to everyone.
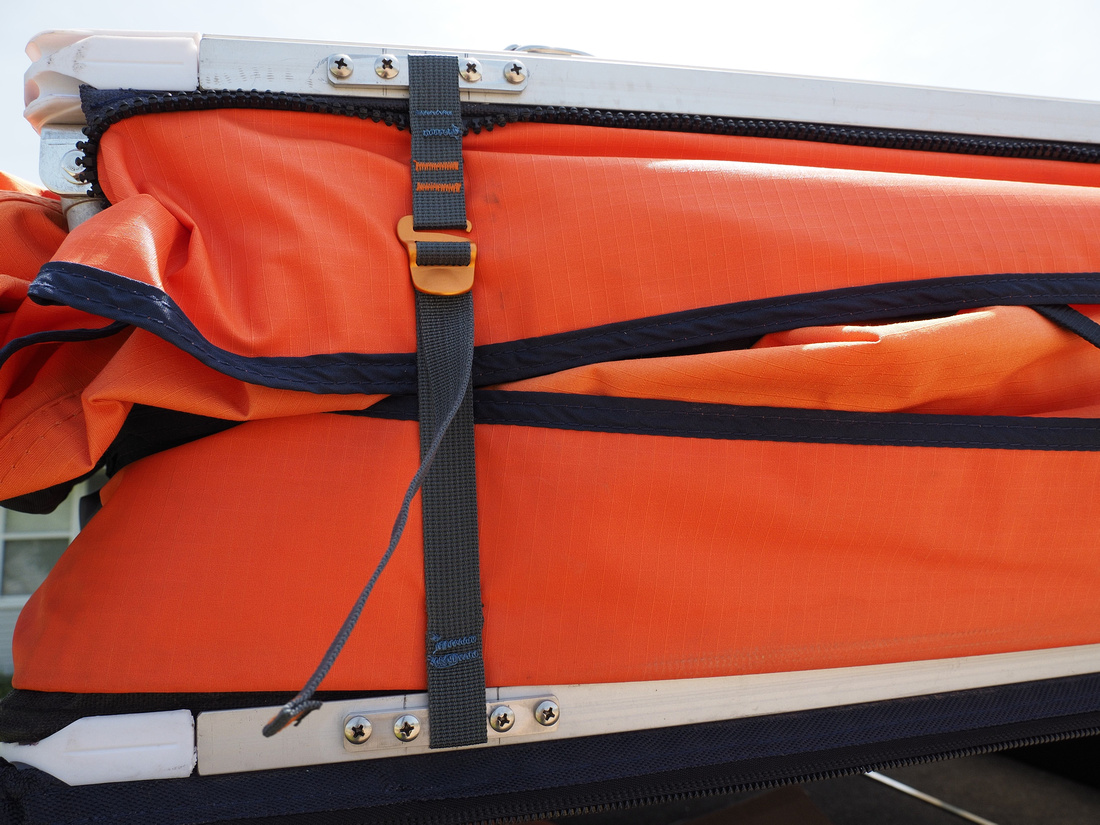
The OEM straps also use chunky blocks of plastic for attachment to the frame, which interferes with the cover zipper. It's frustrating to have the zipper running nicely until it reaches one of these plastic roadblocks. I'm sure a fair amount of Utah dust didn't help, but I recently damaged the cover zipper due to this unnecessary bulge forcing the teeth apart. What's odd is that the long cover straps that go over the cover are anchored by thin pieces of aluminum that are riveted to the frame. I guess the compression strap anchors are designed for easy replacement, but if the things were made better, they'd last much longer.
These straps have become an annoyance when stowing the tent, so it was time to address the problem.
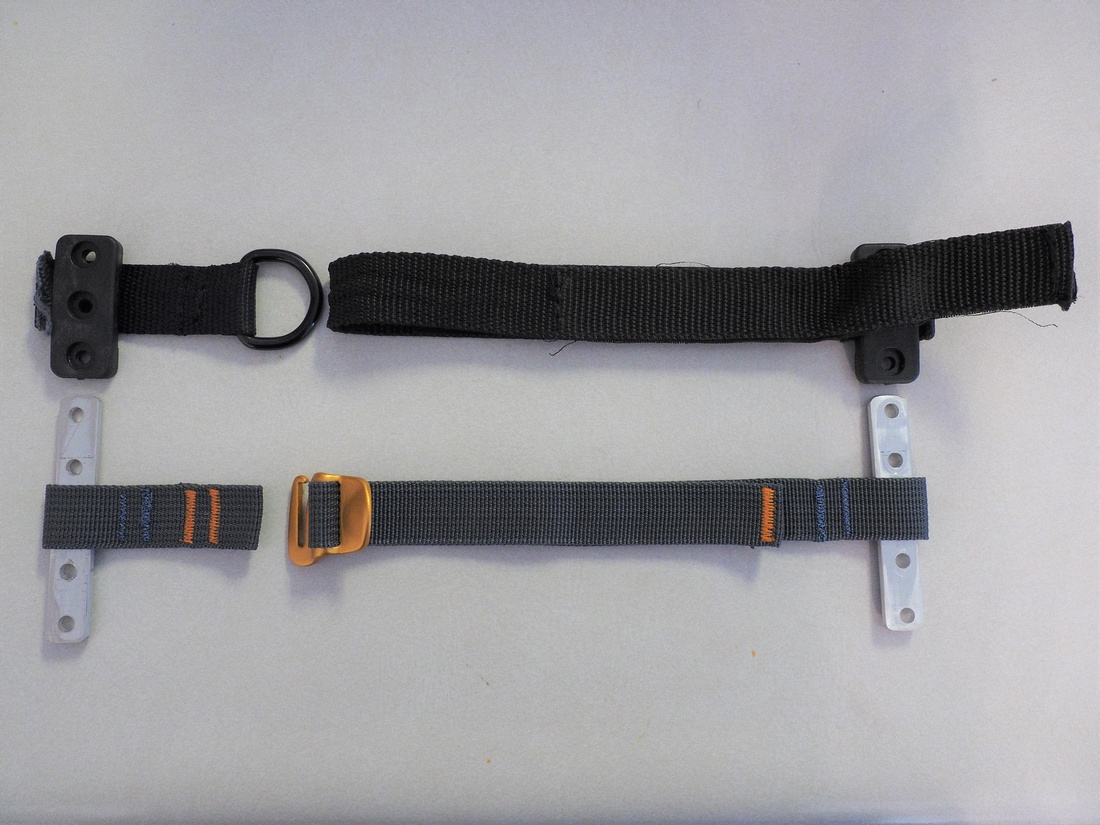
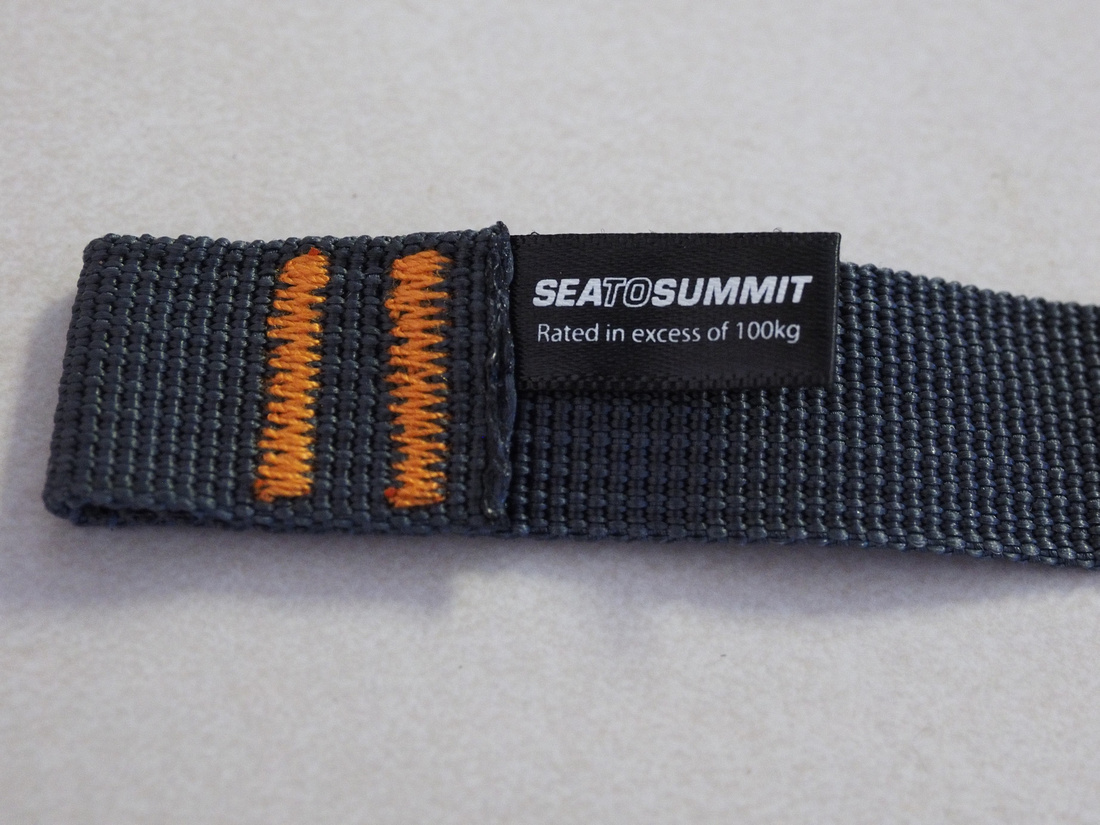
 I modified four Sea to Summit 20mm Accessory Straps with Hook Release for use with anchoring plates I made from 1/8" x 1/2" aluminum bar stock.
The new straps have much slimmer anchor blocks, resulting in less interference with the zipper.

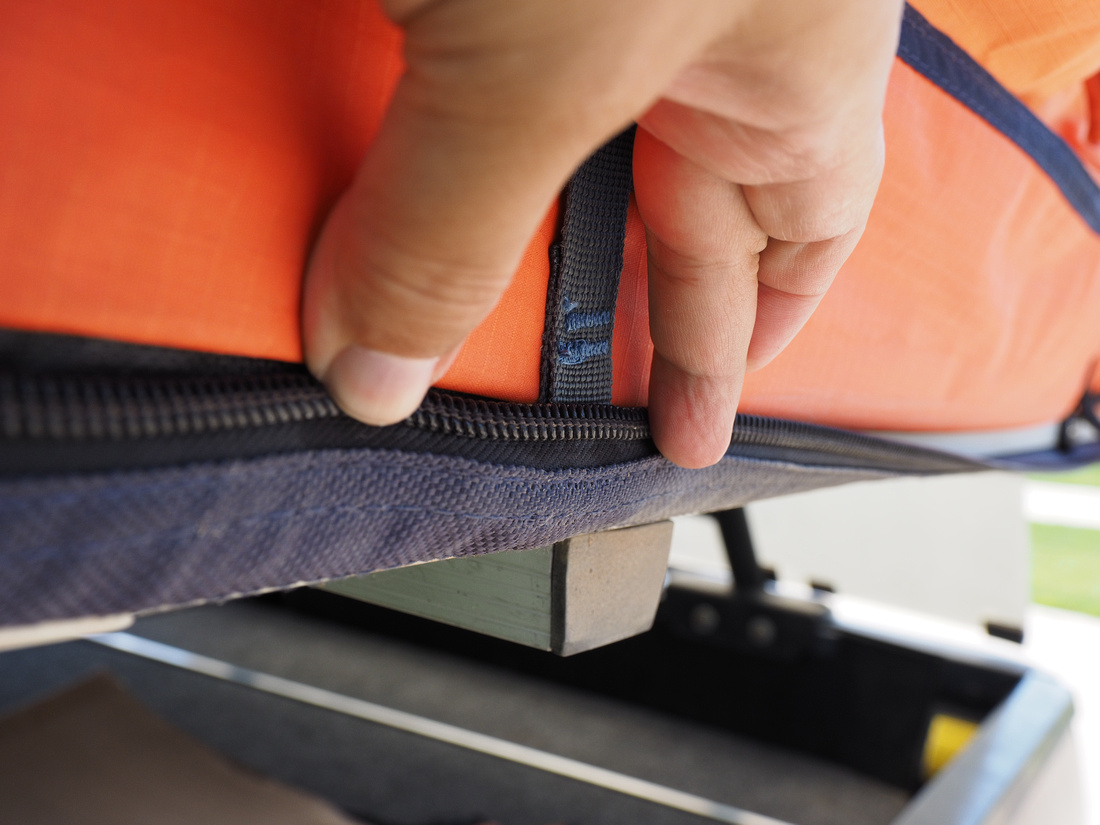
Now for the OEM straps. Note the damaged zipper tooth I massaged back into service. The thick, plastic anchor blocks protrude too much.


For the new anchor blocks, hole size and spacing may vary enough between tents that I recommend using the OEM plastic anchor blocks as a reference. Unlike the three hole design, with a center screw running through the webbing, I opted for two screws per side, with the plates being 3 1/4" long. This allows for the use of wider webbing if the Sea to Summit straps ever fail, and it still allows the use of two of the OEM holes. I prefer keeping the hole count to a minimum. Once the drilling and cutting is complete, deburr the new anchor blocks.
When drilling the blind pilot holes in the frame, I determined that I'd reached the proper depth when I felt the bit break through a small gap in the frame, which I could see was done with the OEM holes. When you drill holes in the frame, make sure the chips don't spin around and flail the tent fabric or zipper. Even though they're aluminum, they can cause damage. Clean up all of those chips, too. You don't want them to be trapped in the skirt fabric, leading to a fouled zipper or chips in the bedding.
The OEM screws are stainless steel #10 x 1/2"round head sheet metal screws, and since my plates use two of the original holes, I continued to use that size for the new screw positions. I drilled 11/64" holes for the screws, and added a few drops of Rapid Tap cutting fluid to aid the threads in cutting through the aluminum frame material. I tried 9/64" first (common recommendation), but even with the cutting fluid and turning them by hand, the screws bound up and the heads snapped off. Running SS screws against the aluminum causes thread galling, so if you intend to do the same, use some kind of cutting lubricant - even a light penetrant like WD-40 or beeswax will help. Also, run them in with a screwdriver, not a power tool.
Since there's little forgiveness at this screw length in aluminum, you may want to try a test hole with your drill bit and screws. There's not much difference between too big of a pilot hole (stripped threads) and too small (broken screws).

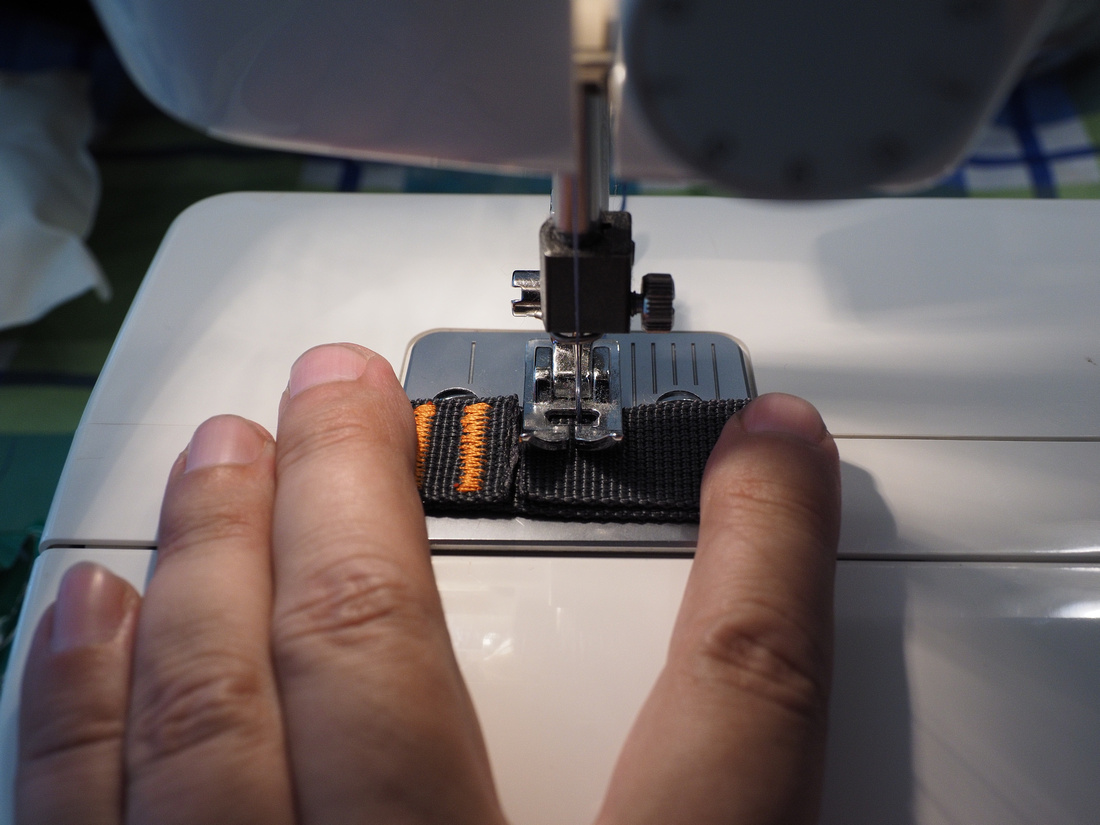
For the straps, I cut the end that already had a double bar tacked loop, and doubled the free end to create a double looped piece of webbing - one loop for the anchor point, one for the buckle. I lightly singed the webbing cuts before sewing. I used a sewing machine with a heavy, 100% nylon thread, and a narrow, zigzag pattern. After a few false starts, I was able to run the machine very slowly while feeding the webbing by hand - the feed mechanism wasn't able to pull the webbing effectively on its own. A single forward and reverse pass created a good bar tack, and I added a second for insurance. My blue bar tacks aren't as pretty as the orange Sea to Summit ones, but they should hold well.

A note on these straps. I saw them advertised as having steel buckles and a higher load rating, but Sea to Summit lists them as aluminum at 100 kg, which is correct. Sea to Summit doesn't have any steel buckled straps, so if you see them listed as steel somewhere, don't be surprised if they aren't. Also, I used the 20mm (3/4") version, not the 10mm straps. I don't believe the narrower version would work as well.
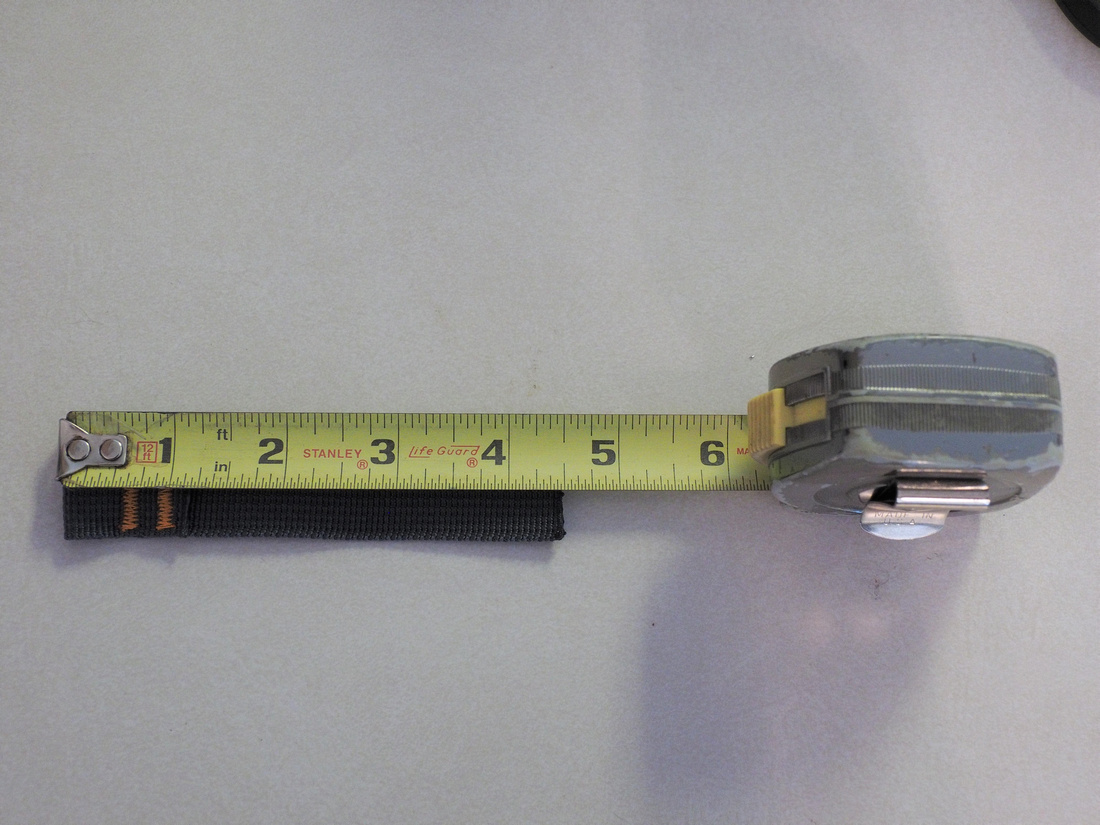
 I pulled the buckle to the finished end, and measured 16" to make my cut. I folded the webbing at 14", and made another double bar tack loop for the lower anchor point. This length worked well for my RTT, as it allows enough slack for a decent grip on the webbing before compression, but doesn't leave a long tail to get in the way of the cover zipper. Other RRTs may vary in thickness when folded; adjust accordingly.

Once you figure out what's going to work, it's easier to replicate the parts so that they all match. I'm sure someone handier with a sewing machine could do a better job, but mine didn't care for the thick, slippery webbing, so I resorted to manually turning the handwheel for better control.
 Sea to Summit rates the straps & buckles at 100kg, which for me, means I can lift myself off the ground by the strap and still not exceed the rating. As long as no one is bouncing on the top or yanking on a strap, they should never fail due to an excessive load. I really like how easily they release under tension, which can be a problem with some buckles or D-ring solutions. I'll keep an eye on the webbing for wear, but I believe these will last a long time.
I may add another pair of straps to the side opposite the hinges, but I'm not sure there's much more compression to be gained. They might relieve some of the stress of the two far-side straps, and add some redundancy to the compression system where it's needed most.
I hope this helps others improve their RTTs and avoid the zipper damage I've experienced. The materials cost around US$30, but if similar buckles could be sourced individually and generic webbing was used, the project could be done for less. As for the sewing, it could be done by hand with a heavy needle and thimble, but it'd take some time to do it right.
I'll report back on how they worked after my next trip.
]]>
My home had one. It died. It didn't have one. Now it has a new one.
Wireless home alarm systems have improved, and after some recent burglaries in my neighborhood, I decided it was time to replace the old, wired system that died a few years ago. I know I could re-use the existing wiring, but buying everything else new still wouldn't have given the house the coverage it should've had in the first place. I don't mind pulling wire, but it seemed a needless hassle with so many wireless systems available.
Installation of mine was straightforward and only took an hour or so, but I have a few tips for the wireless installer.
When testing the sensors, I found it very helpful to use a pair of FRS radios, with one by the base station set to VOX. This allowed me to hear the trigger message of each sensor as I walked around the house. The same thing could be accomplished with a pair of mobile phones, with one set to speakerphone. A second person would've helped, but even then, not having to yell would be an improvement.
The second tip came from a surprising gap in the otherwise detailed instructions included with my system. Before installing a thing, record the type & unique identifier (UI) of every component, and record its installed location. With my system, the UIs are labeled on the component boxes and the components, but it can be much easier to record the information before a component is installed. My advice is to record an accurate list, store it online, and print out a copy to keep with the base station.
This will make troubleshooting easier, as I don't believe many (any?) consumer grade wireless alarms allow for programming a detailed assignment list into the system. For example, if an entry sensor is open, my system's display shows "1 Entry Sensor Open" and then the UI of the balky sensor. In the settings menu, I can manually delete individual components by Type:UI, as in "Entry Sensor: THX1138". That's somewhat helpful, but there's still no way for the system to tell me where a sensor is installed. Maybe some people can accurately recall rarely used alphanumeric assignments years after installation, but I can't.
The last tip is more dependent on system specs, but worth consideration. My system uses a mobile connection for monitoring, so even if the POTS or cable TV lines are cut, it can make a call. If it loses power, it still has an internal battery backup that provides several hours of power. If your alarm system lacks backup power, you can easily correct the deficiency. It just makes sense to me to remove such an obvious point of failure.
With a few days of use, I haven't had any problems other than the one entry sensor fault, but that's due to how I had it installed on a window, which I've since fixed. With all of the bundled sensors installed, I have a better idea of how many more I need to complete the installation. Once I'm happy with the complete installation, I'll use the tiny screws that were included to mount the sensors a little more firmly. The foam tape does a good job, but over time, adhesive can release, leading to a sensor falling to the ground, and a false alarm event.
]]>Many years ago, a friend of mine drove a transit bus, and always had some funny stories from his innumerable loops around town. He came in laughing one day, and told me about a strange passenger (mind you, this would qualify a person as exceptionally strange to most people) that caused a disturbance. He couldn't tell what the guy was doing in his rear seat, but every time the bus accelerated from a stop, the guy did a one-man human wave and yelled something. My friend thought he was signalling for help or something, so he pulled over and walked to the rear of the bus to see what the guy was on about. Human Wave grinned and said, "I just like to yell Zoom! Zoom! every time you step on the gas. It's fun!" After that, every cheerful, odd duck on the bus was referred to as a "zoomer", and I put it in use, too.
Some time later, I was training for my current job, and my boss overheard me refer to an interesting fella as a zoomer. He liked it enough that he still asks me how the zoomers are doing as I make my rounds. Given my work, and a few of the people I met on a recent trip to the American Southwest, Zoomer Patrol seems like an appropriate name for this place.
I haven't decided if I'm the Zoomer Wrangler or Head Zoomer; depends on the day, I suppose.
]]>The standard size, 20 L MWC comes in a variety of colors, and a 10 L size is available. If you don't have a permanently mounted fresh water tank, it's hard to go wrong with one.

As good as an MWC is, there are still times where another solution may work better. Enter the Cornelius keg. I spent more time than I wanted to this afternoon learning the finer points of the Cornelius keg. Perhaps you've seen some of these lurking under a restaurant or bar counter.

Bag-in-Box systems have largely replaced Cornelius kegs for transporting soft drink syrup, but there's a steady demand for the old tanks by home brew beer makers. I've no interest in that, but their popularity makes it easy to find new parts, once you determine what fits your keg.
Dad gave me a keg years ago, and it's been quietly resting in my backyard since. I have a need for another 5 gallons of water capacity, and I decided it was time to turn the old keg into something useful. With a little work and some new parts, mine will be resurrected as a roof mounted, solar heated, pressurized water source for showers & camp kitchen use.
It took several tries to get my order to go through at Corny Keg, but I finally succeeded when using Microsoft Edge. Otherwise, I found the site very informative, with a wide range of parts at reasonable prices. In particular, the Tips page on keg identification was a real find, since there are a variety of Cornelius keg models, with slightly different threads.
Rather than try to rebuild the crusty old pin lock posts on my Corny, I'm replacing them with new ball locks and connectors. I also swapped the old lid for one with a manual pressure relief valve, which will make it easier to depressurize the keg when I need to remove the lid. I'm adding a short Schraeder valve to the lid so I can pressurize the keg with my portable compressor.
I used a kitchen faucet sprayer with an adapter to transition from the threaded fitting to a 1/4" hose barb. The kitchen sprayer pattern fills bottles & bladders well, and does a good job for dishes & bathing. A bungee or strap holds the tank in the rear cab corner well, and I can remove it for use in a small shower tent, as needed. I need to refine the mount, but a carpet pad cushions it nicely in the corner, and keeps it out of the way of my fridge slide.
Here's a photo a friend of mine took while in the Maze District, Canyonlands NP.
Update: I've used this tank for two weeklong trips, and it does its job perfectly. It hasn't leaked, but I may install a 1/4" ball valve to shut off pressure to the hose when not in use. I used a kitchen faucet sprayer hose, which is rated for at least 50 psi, but I don't want to chance a leak and have several gallons of water sprayed into the truck cab.
Even if all of the parts are bought new, I believe this is a much better value than some of the other options for a pressurized water source. No offense to competing products, but they typically cost more and may not be as hardy. Corny kegs have proven to be very durable over decades of use in the food industry, and for a self-contained solution, there's little room for improvement.
]]>One of the reasons I bought a Tacoma was for the aftermarket parts support, and bumpers are no exception. My preference for a lighter build has guided many of my choices (aluminum skid plates instead of steel, Softopper instead of hard shell, etc.), so at half the weight of steel, an aluminum plate bumper was the way to go. I've always admired the designs and craftsmanship of Pelfreybilt products, and their recent free shipping offer pushed me to place an order. I decided on a single, center hoop design, which brought the weight to 65 lbs.

Next, it was time to figure out what winch made sense for me. I wanted a simple, reliable, affordable option; speed and flashy features weren't important to me. I've had good luck using an Engo winch on a car hauler trailer for construction jobs, but I decided that the Superwinch Tiger Shark TS 9500 SR was worth a little more for the better control box and parts availability. I also opted for a Factor 55 fairlead and FlatLink, along with some BubbaRope Gator-Jaw synthetic shackles.

You can see the large light bar slot in the bumper, above the fairlead opening. Having the winch and light nested inside the bumper protects them much better from the environment and thieves, but it also means that any serious problems may require removing the entire bumper for repairs. Even with an aluminum bumper and synthetic winch rope, that's 125 lbs to wrestle with, and I'd rather not have to do that often. With that in mind, I decided to skip some cheaper light options and ordered a Rigid Industries SR-Series 20" Combo bar.

Other than the OEM headlights and the (weak) OEM fog lights, I have no other lights on the truck. I've been late getting back to camp on some very dark nights, and had to resort to using a handheld spotlight to find the turns. The combination of Specter flood (not sure which type) and Hyperspot driving lights should form a solid base for trail lighting. If I need more, I can nest a pair of better lights in the round holes in the bumper, or mount a pair of side floods near the front of the roof rack. I don't want a full width light bar on the front of the rack due to increased wind noise and glare from precipitation, dust, and the hood.

Here's the rub: I didn't expect the bumper to arrive for another two weeks, but it's in my garage, along with everything else. I'm leaving soon for a trip to Canyonlands National Park Maze District, and I'd feel pretty stupid if I ripped off the OEM bumper, or needed a winch that was boxed up at home.
Rather than spend $175 to have Pelfreybilt powdercoat the bumper, I decided to paint it myself. It's been a busy weekend rounding up painting supplies while trying to get other projects finished before the trip. I have to peel off the OEM bumper parts, test fit the bumper (along with the winch & light), prep & paint it, and mount everything once the paint cures. I have aluminum primer and black hammer paint, which I hope will hold up well enough.
I'm going to start removing the old bumper tonight and see how far I get.
]]>![[IMG]](https://i112.photobucket.com/albums/n178/ocspray/2014%20Death%20Valley/PA200277_zpsmwcribdo.jpg?t=1439788859)
Death Valley, Saline Valley Road, October 2015
I'm pulling this from another site, and I'll fix the links as I migrate to Zenfolio.
Over the last several years, I've been able to spend more time and money on enjoying the out-of-doors. Buying a truck and slowly modifying it has been a fun experience, and has allowed me to figure out what works for me. I'm not interested in more extreme 4WD travel, since I'm often solo and a long way from home, but I try to prepare for conditions.
Keeping the truck relatively light and functional as a daily driver has guided some of my decisions, such as using aluminum skid plates. Here's a list of the modifications I've made, linked to manufacturer's information and some personal installation notes. Feel free to post questions in the Comments section.
2012 Toyota Tacoma / Double Cab, Short Bed / Off-Road Package / Magnetic Gray Metallic
Front Suspension - installation notes & full suspension parts list
Fox 2.5 Pro Series Front OEM replacement coilovers for 2005+ Tacoma
Part# 880-02-418-A (26.5 lbs each): Extended 22.51" - Collapsed 17.58" - Stroke 4.93"
2014 Fox Application Guide
SPC - Light Racing Upper Control Arms: Part# 25470 (9 lbs each)
Wheeler's Off-Road SuperBumps: Part# WHE 01SUPERBUMPKIT
MOOG Problem Solver Caster / Camber Cam Bolt Kit: Part# K100128 - TW thread
Extended brake hoses front & rear - Review
Rear Suspension - installation notes
Fox 2.0 Pro Series Rear Shocks for FJ Cruiser, with Piggyback reservoir & CD Adjuster
Part# 980-02-417-A (8.5 lbs each): Extended 24.464" - Collapsed 14.839" - Stroke 9.625"
OME 2.75" lift Dakar Leaf Springs (top overload removed): Part# CS047R (71 lbs each) - OZ-T Anti-Squeak Solution
Timbren SES rear bump stops: Part# TORTUN4L - Review
Wheels & Tires
TRD Off-Road Wheels: 16" x 7", +32 mm offset, 5.25" backspacing, 6 x 5.5" bolt pattern
Goodyear Wrangler DuraTrac 265/75-16 C (LT265/75R16C1 112Q W), including spare tire - Review
Cooper Discoverer S/T MAXX 265/75-16 Load E (123/120Q) - waiting to be mounted
Armor
BudBuilt 5 piece skid plate combo (1/4" aluminum) - Review
V6 exhaust crossover pipe rerouted for better skid plate fit - Review
Famous Fabrication Rock Sliders (out of production) - Review
Exterior
Plasticolor 11"x19" Mud Guards - Review
WeatherTech Stone & Bug Deflector: Part# 50209
X-Pel Headlight Protection: Part# H0125B - Review
Fluid Film undercoating treatment - Review
AntennaX EuroStyle 13" flexible AM/FM antenna: Part# F010-TOY17
KB Voodoo tailgate cap - Review
Interior
Wet Okole seat covers
WeatherTech FloorLiner DigitalFit floor mats: Part# 444531-440213
Auto Ventshade Stepshield Black Door Sill Protector: Part #91021
Blueinstinct's Cover Combo
ImMrYo Rearview Mirror Lift Bracket
Electrical
Group 31 Super Start Fleet & Heavy Duty - AGM Battery: Part # AGM31T - Review
CTEK D250S Dual DC/DC battery charger
Blue Sea Systems ST Blade Fuse Block #5026
Blue Sea Systems 285-Series Circuit Breaker - Panel Mount 100A
Pelfreybilt Blue Sea Fuse Panel mounting plate
Pelfreybilt Group 31M Battery Cage - Review
Blue Sea Systems 12 Volt Plug with Double Extension Socket
Blue Sea Systems 12 Volt Plug with Dash Socket
Anker car chargers & cables - Review
VLEDS Reverse Lights (5K Platinum 15 LED 921)
Cargo Management
PrInSu Design Studio Roof Rack, with six additional crossbars (60 lbs) - Photos
Softopper bed topper with storage boot: Part# TCCC60 - Review
BedRug bed & tailgate mat: Part# BMY05DCS - Review
Quick Fist 8 Piece Mounting Kit: Part# QF-90010
JP Metal Fab Stainless Steel HOOK-UPS Custom Tie-Down Bracket Kit: Part# hu_toytac
Rubbermaid ActionPackers - 24 gal. (#1172) x 2, and 48 gal. (#1192) x 1
Army Surplus Warehouse - Rope Ring with Clip B21 (bed D-rings)
Tekonsha P3 electric brake controller: Part# 90195
Hopkins Multi-Tow Trailer Connector Adapter (7-Way to 5-Wire Flat/4-Wire Flat and 12-V Socket): Part# 47675
Convert-A-Ball Dual-Cushioned, Adjustable Ball Mount: Part# UM
Pop & Lock tailgate lock: Part# PL5300 superseded by PL5500
Shelter
Tepui Autana Ruggedized
Relentless Fabrication Tall Bed Bars
DAC Full - Size Truck Tent - with DIY frame to support tent
DIY Short Bed Sleeping Platform
Indel B Travel Box 50 Liter Fridge Freezer - Review
Custom Fridge Slide
Recovery
MAXTRAX MKII in Safety Orange, with mounting pins & roof rack mount - Photos
Hi-Lift All-Cast 60" Jack: Part# HL-605
Hi-Lift Handle-Keeper (Black): Part# HK-B
Hi-Lift Lift-Mate: Part# LM-100
Hi-Lift Off-Road Base: Part# ORB
Hi-Lift Jack Off-Road Kit: Part# ORK
Hi-Lift Jack Fix-It-Kit: Part# FK-1
Rescue 42 JackMate
Overland XT Hi-Lift Slider Adapter
Warn Receiver Shackle Bracket: Part# 29312
Grade 70 3/8''x25' Chain
ASR Kinetic Recovery Rope: 1"x20' - Review
ARB Tree Protector: 3"x 10'
Van Beest Green Pin shackles: 3/4"
Tiger Shark D-handle shovel
Assorted straps and shackles
VIAIR 400P-RV Automatic portable compressor: Part# 40047
Milton 503 Inflator Gauge
ARB E-Z Deflator: Part#ARB505
ARB Orange Speedy Seal Tire Repair Kit: Part# 10000010
Slime Tire Repair Strings 30 Pack x 2: Part# 1031-A
Clore Automotive Jump Starter: Part# JNC660 - Review
Scepter 20L MFC with 3/4" spout
Scepter 20L MWC with JAGMTE self-venting spigot
MFC cap K Wrench
Emergency Triangle Reflectors
Diagnostic
2012 Tacoma, Toyota Factory Service Manual (download in progress)
UltraGauge MX 1.3, with horizontal surface mount
Windows scantool that looks an awful lot like Toyota Techstream